

在Kubernetes中安裝Service Mesh:以Istio Sidecar為例
Service Mesh 是一個專門處理微服務間通信的基礎設施層,提供功能如流量管理、負載均衡、安全加密、服務發現和觀察性。Istio 是目前最流行的 Service Mesh 解決方案之一,具有強大的功能和靈活的架構。
先決條件
在開始之前,請確保您的 macOS 環境已經具備以下軟體:
-
Homebrew:macOS 的套件管理工具,用來安裝其他必要軟體。
-
KinD: 一種基於 Docker 的本地 Kubernetes 集群工具,用於在本地開發與測試 Kubernetes 工作負載。 可以透過 Homebrew 安裝:
brew install kind更多詳細說明可參考 在本機用 KinD 建立 Kubernetes。
-
Helm: Kubernetes 的應用程式包管理工具,用於簡化應用部署與管理。可以透過 Homebrew 安裝
brew install helm
安装 Kubernetes Gateway API CRD
如果 Gateway API CRD 尚不存在,請安裝它們:
kubectl get crd gateways.gateway.networking.k8s.io &> /dev/null || \
{ kubectl kustomize "github.com/kubernetes-sigs/gateway-api/config/crd?ref=v1.2.0" | kubectl apply -f -; }
指令執行成功後會顯示以下類似訊息
customresourcedefinition.apiextensions.k8s.io/gatewayclasses.gateway.networking.k8s.io created
customresourcedefinition.apiextensions.k8s.io/gateways.gateway.networking.k8s.io created
customresourcedefinition.apiextensions.k8s.io/grpcroutes.gateway.networking.k8s.io created
customresourcedefinition.apiextensions.k8s.io/httproutes.gateway.networking.k8s.io created
customresourcedefinition.apiextensions.k8s.io/referencegrants.gateway.networking.k8s.io created
安裝 Istio
1. 新增 Istio 儲存庫:
helm repo add istio https://istio-release.storage.googleapis.com/charts
指令執行成功後會顯示以下類似訊息
"istio" has been added to your repositories
2. 更新 Helm Chart 儲存庫
helm repo update istio
指令執行成功後會顯示以下類似訊息
Hang tight while we grab the latest from your chart repositories...
...Successfully got an update from the "istio" chart repository
Update Complete. ⎈Happy Helming!⎈
3. 安裝 Istio Base
它包含了叢集範圍的自訂資源定義 (CRD),這些資源必須在部署 Istio 控制平面之前安裝:
helm install istio-base istio/base \
  --namespace istio-system \
  --create-namespace \
  --set defaultRevision=default
指令執行成功後會顯示以下類似訊息
NAME: istio-base
LAST DEPLOYED: Sun Dec  8 02:26:51 2024
NAMESPACE: istio-system
STATUS: deployed
REVISION: 1
TEST SUITE: None
NOTES:
Istio base successfully installed!

To learn more about the release, try:
  $ helm status istio-base -n istio-system
  $ helm get all istio-base -n istio-system
4. 安裝 Istio CNI
helm install istio-cni istio/cni \
  --namespace istio-system
指令執行成功後會顯示以下類似訊息
W1208 02:36:54.288065   89890 warnings.go:70] spec.template.metadata.annotations[container.apparmor.security.beta.kubernetes.io/install-cni]: deprecated since v1.30; use the "appArmorProfile" field instead
NAME: istio-cni
LAST DEPLOYED: Sun Dec  8 02:36:54 2024
NAMESPACE: istio-system
STATUS: deployed
REVISION: 1
TEST SUITE: None
NOTES:
"istio-cni" successfully installed!

To learn more about the release, try:
  $ helm status istio-cni -n istio-system
  $ helm get all istio-cni -n istio-system
5. 安裝 Istio Discovery
helm install istiod istio/istiod -n istio-system --set pilot.cni.enabled=true
指令執行成功後會顯示以下類似訊息
NAME: istiod
LAST DEPLOYED: Sun Dec  8 02:36:59 2024
NAMESPACE: istio-system
STATUS: deployed
REVISION: 1
TEST SUITE: None
NOTES:
"istiod" successfully installed!

To learn more about the release, try:
  $ helm status istiod -n istio-system
  $ helm get all istiod -n istio-system

Next steps:
  * Deploy a Gateway: https://istio.io/latest/docs/setup/additional-setup/gateway/
  * Try out our tasks to get started on common configurations:
    * https://istio.io/latest/docs/tasks/traffic-management
    * https://istio.io/latest/docs/tasks/security/
    * https://istio.io/latest/docs/tasks/policy-enforcement/
  * Review the list of actively supported releases, CVE publications and our hardening guide:
    * https://istio.io/latest/docs/releases/supported-releases/
    * https://istio.io/latest/news/security/
    * https://istio.io/latest/docs/ops/best-practices/security/

For further documentation see https://istio.io website
6.驗證安裝
檢查 Istio 是否成功運行:
kubectl get pod -n istio-system
指令執行成功後會顯示以下類似訊息
NAME                      READY   STATUS    RESTARTS   AGE
istio-cni-node-lsz47      1/1     Running   0          99s
istiod-596bfd454f-ksww4   1/1     Running   0          94s
helm list -n istio-system指令執行成功後會顯示以下類似訊息
NAME      	NAMESPACE   	REVISION	UPDATED                             	STATUS  	CHART        	APP VERSION
istio-base	istio-system	1       	2024-12-08 02:26:51.598058 +0800 CST	deployed	base-1.24.1  	1.24.1
istio-cni 	istio-system	1       	2024-12-08 02:36:54.026448 +0800 CST	deployed	cni-1.24.1   	1.24.1
istiod    	istio-system	1       	2024-12-08 02:36:59.365702 +0800 CST	deployed	istiod-1.24.1	1.24.1
部署範例程式並整合 Istio
下載 Istio 範例
我們要使用Istio官方提供的範例,因此下載Istio範例
curl -L https://istio.io/downloadIstio | sh -
  % Total    % Received % Xferd  Average Speed   Time    Time     Time  Current
                                 Dload  Upload   Total   Spent    Left  Speed
100   101  100   101    0     0    217      0 --:--:-- --:--:-- --:--:--   219
100  5124  100  5124    0     0   5217      0 --:--:-- --:--:-- --:--:-- 23722

Downloading istio-1.24.1 from https://github.com/istio/istio/releases/download/1.24.1/istio-1.24.1-osx.tar.gz ...
Istio 1.24.1 download complete!

The Istio release archive has been downloaded to the istio-1.24.1 directory.

To configure the istioctl client tool for your workstation,
add the /Users/houpolin/IT/istio/istio-1.24.1/bin directory to your environment path variable with:
	 export PATH="$PATH:/Users/houpolin/IT/istio/istio-1.24.1/bin"

Begin the Istio pre-installation check by running:
	 istioctl x precheck

Try Istio in ambient mode
	https://istio.io/latest/docs/ambient/getting-started/
Try Istio in sidecar mode
	https://istio.io/latest/docs/setup/getting-started/
Install guides for ambient mode
	https://istio.io/latest/docs/ambient/install/
Install guides for sidecar mode
	https://istio.io/latest/docs/setup/install/

Need more information? Visit https://istio.io/latest/docs/
接下來在目錄中應該就會看到 istio-1.24.1 的資料夾
為Namespace啟用Sidecar Injection
假設應用部署在default命名空間,可以使用以下命令啟用自動 Sidecar Injection:
kubectl label namespace default istio-injection=enabled
驗證配置
部署範例應用
部署測試應用並驗證 Pod 是否包含 Istio Sidecar 容器:
我們進到剛下載的範例程式資料夾
cd istio-1.24.1
套用範例程式
kubectl apply -f samples/bookinfo/platform/kube/bookinfo.yaml
一段時間後,查看Pod狀態
kubectl get pods
成功後會顯示以下類似訊息
NAME                             READY   STATUS    RESTARTS   AGE
details-v1-79dfbd6fff-fp6fn      2/2     Running   0          17s
productpage-v1-dffc47f64-gj5dq   2/2     Running   0          17s
ratings-v1-65f797b499-qjjhb      2/2     Running   0          17s
reviews-v1-5c4d6d447c-q987v      2/2     Running   0          17s
reviews-v2-65cb66b45c-55tbl      2/2     Running   0          17s
reviews-v3-f68f94645-6blsl       2/2     Running   0          17s
Pod 顯示 READY 2/2,確認它們具有應用程式容器和 Istio Sidecar 容器。
透過檢查回應中的頁面標題來驗證應用程式是否在叢集內運行:
kubectl exec "$(kubectl get pod -l app=ratings -o jsonpath='{.items[0].metadata.name}')" -c ratings -- curl -sS productpage:9080/productpage | grep -o "<title>.*</title>"
成功後會顯示以下類似訊息
<title>Simple Bookstore App</title>
對外開放應用
為 Bookinfo 應用程式建立 Kubernetes Gateway:
kubectl apply -f samples/bookinfo/gateway-api/bookinfo-gateway.yaml
指令執行成功後會顯示以下類似訊息
gateway.gateway.networking.k8s.io/bookinfo-gateway created
httproute.gateway.networking.k8s.io/bookinfo created
預設情況下 Istio 會為 Gateway 建立一個 LoadBalancer 服務
但是因為我們在本機應用,所以先把 type 改成 ClusterIP
kubectl annotate gateway bookinfo-gateway networking.istio.io/service-type=ClusterIP --namespace=default
檢查Gateway是否正常啟動
kubectl get gateway
指令執行成功後會顯示以下類似訊息
NAME               CLASS   ADDRESS                                            PROGRAMMED   AGE
bookinfo-gateway   istio   bookinfo-gateway-istio.default.svc.cluster.local   True         110s
我們也可以看到在default下的service多了一個bookinfo-gateway-istio
kubectl get svc
指令執行成功後會顯示以下類似訊息
NAME                     TYPE        CLUSTER-IP      EXTERNAL-IP   PORT(S)            AGE
bookinfo-gateway-istio   ClusterIP   10.96.143.216   <none>        15021/TCP,80/TCP   13m
訪問應用程式
接下來,我們利用port-forward的方式
把bookinfo-gateway-istio的服務對外開放
kubectl port-forward svc/bookinfo-gateway-istio 8080:80
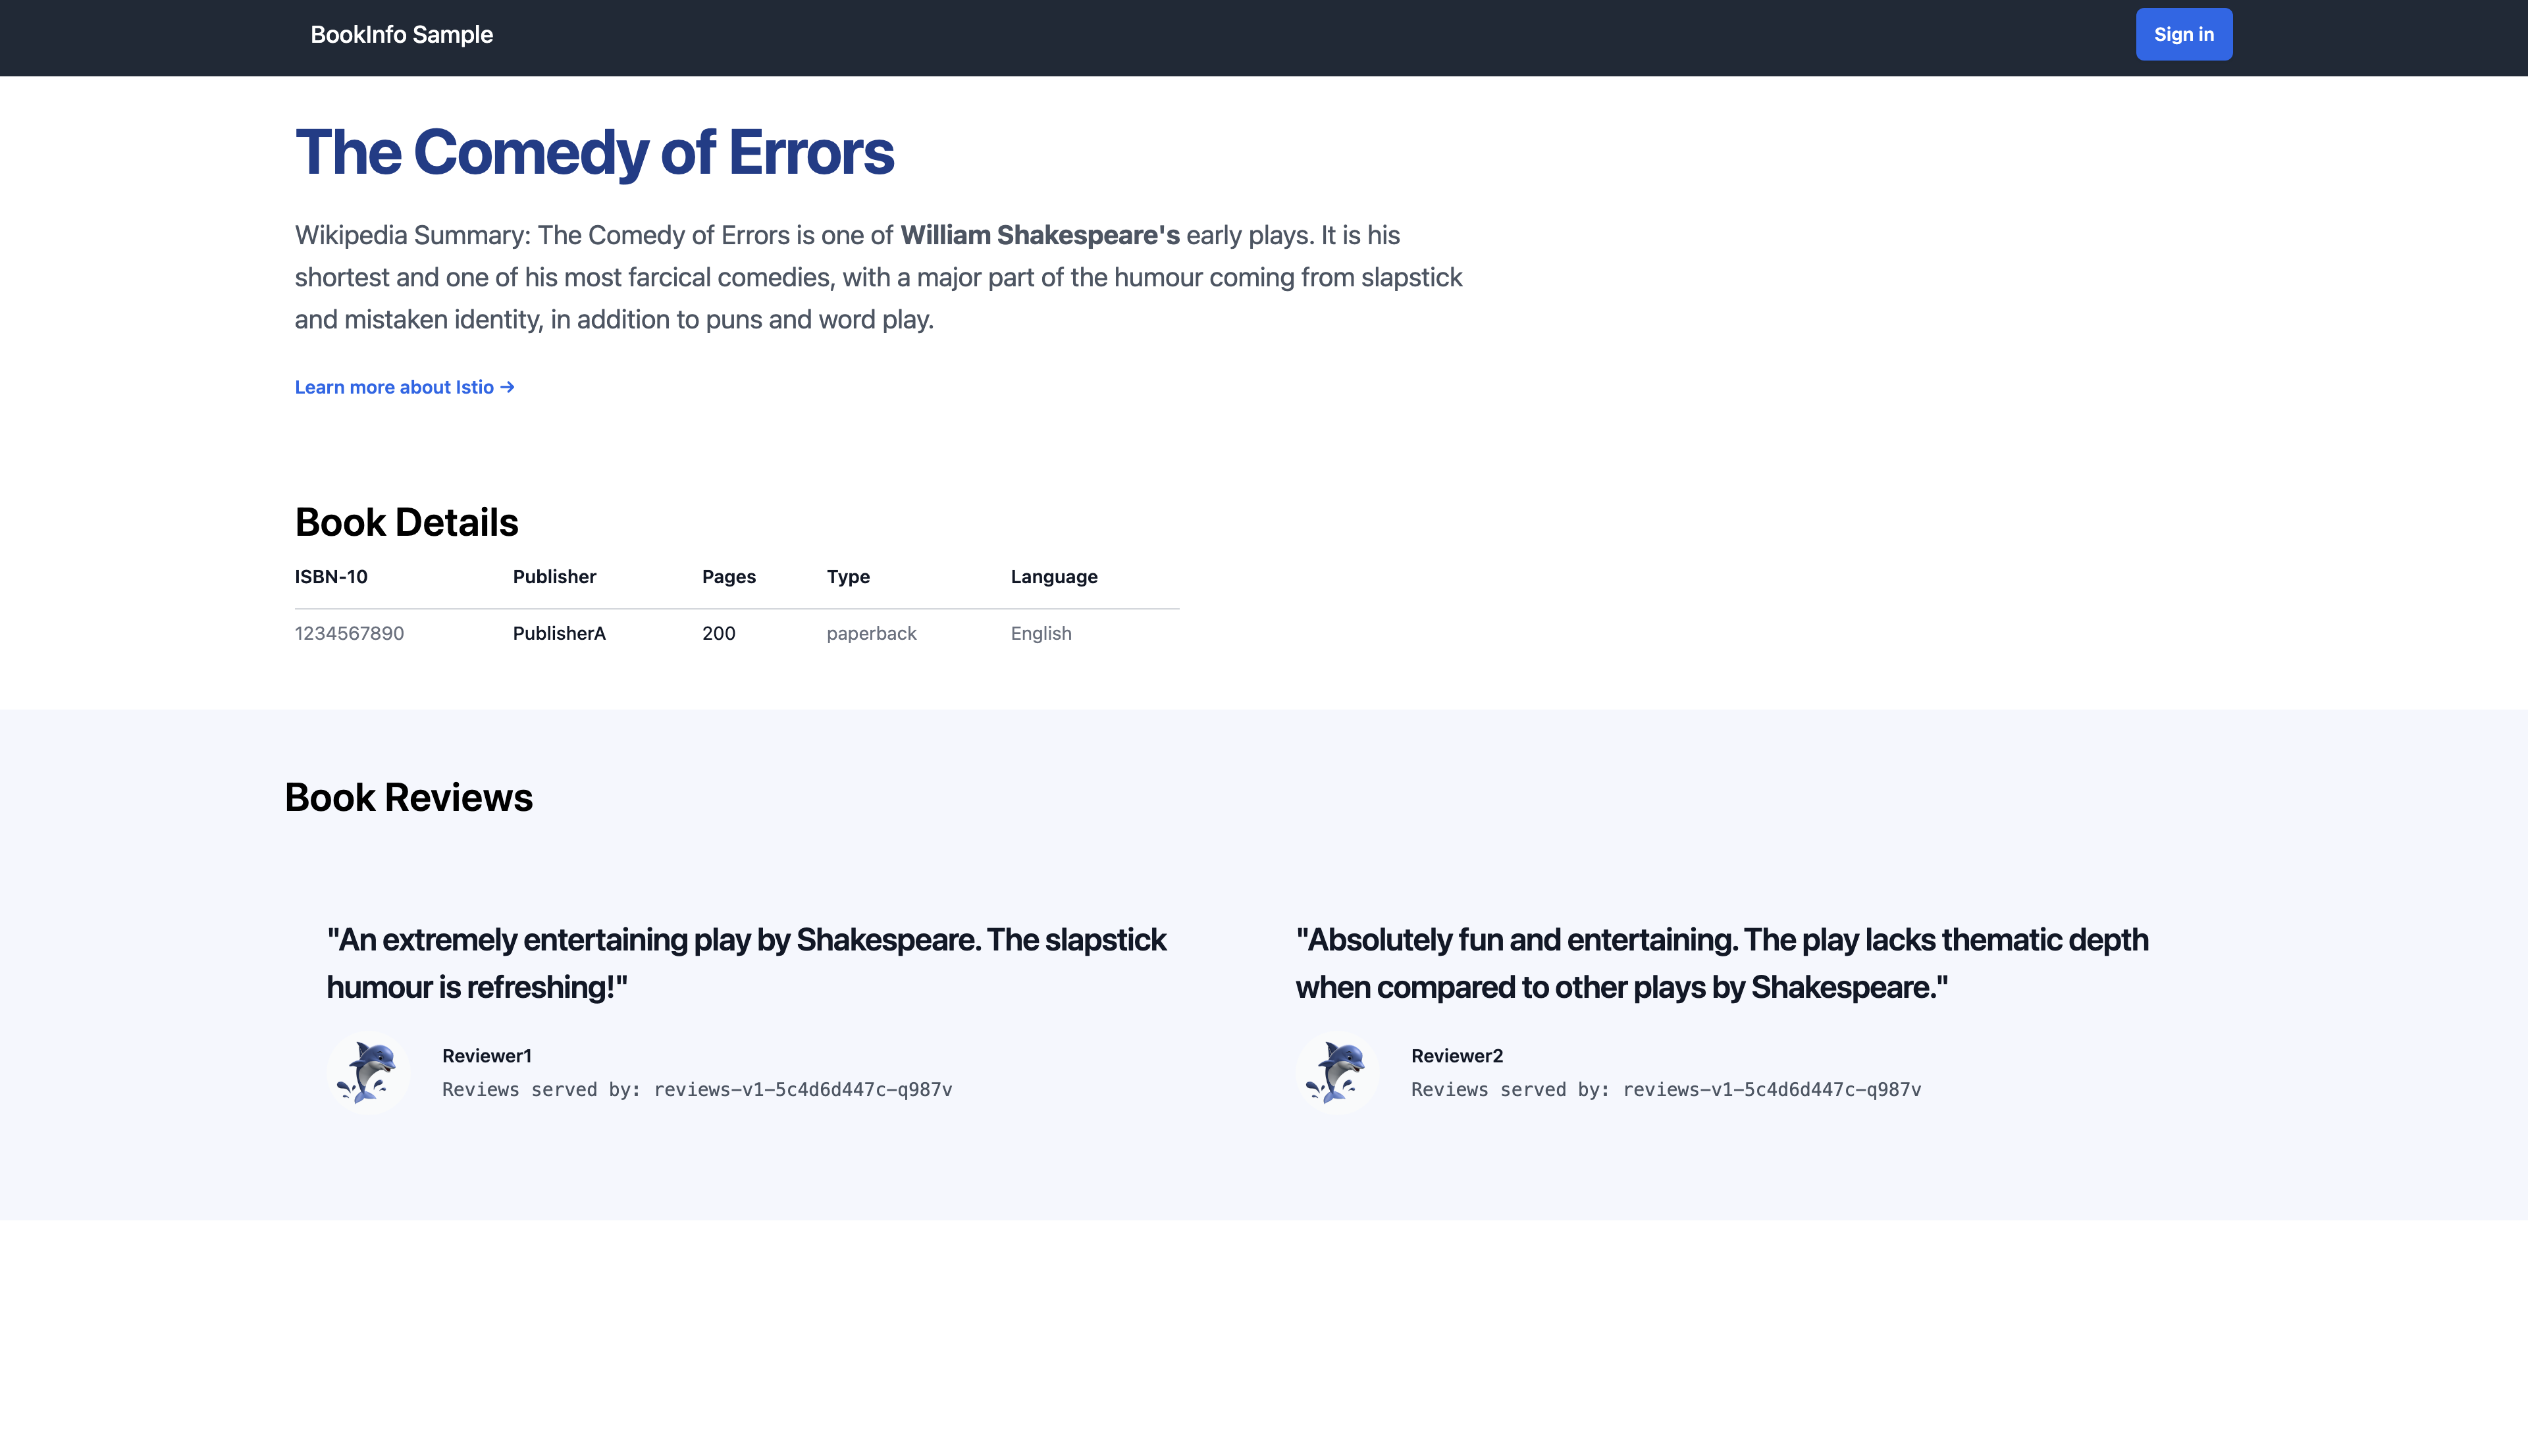
開啟瀏覽器訪問 http://localhost:8080/productpage 以查看 Bookinfo 網頁
查看儀表板
安裝 Kiali 和其他插件
一樣使用範例程式資料夾裡面的YAML
安裝 Kiali 和其他插件,等待部署完成。
kubectl apply -f samples/addons
指令執行成功後會顯示以下類似訊息
serviceaccount/grafana created
configmap/grafana created
service/grafana created
deployment.apps/grafana created
configmap/istio-grafana-dashboards created
configmap/istio-services-grafana-dashboards created
deployment.apps/jaeger created
service/tracing created
service/zipkin created
service/jaeger-collector created
serviceaccount/kiali created
configmap/kiali created
clusterrole.rbac.authorization.k8s.io/kiali created
clusterrolebinding.rbac.authorization.k8s.io/kiali created
service/kiali created
deployment.apps/kiali created
serviceaccount/loki created
configmap/loki created
configmap/loki-runtime created
clusterrole.rbac.authorization.k8s.io/loki-clusterrole created
clusterrolebinding.rbac.authorization.k8s.io/loki-clusterrolebinding created
service/loki-memberlist created
service/loki-headless created
service/loki created
statefulset.apps/loki created
serviceaccount/prometheus created
configmap/prometheus created
clusterrole.rbac.authorization.k8s.io/prometheus created
clusterrolebinding.rbac.authorization.k8s.io/prometheus created
service/prometheus created
deployment.apps/prometheus created
一段時間後,查看Pod狀態
kubectl get pods -n istio-system
成功後會顯示以下類似訊息
NAME                          READY   STATUS    RESTARTS   AGE
grafana-6b45c49476-7jrts      1/1     Running   0          32s
istio-cni-node-lsz47          1/1     Running   0          8h
istiod-596bfd454f-ksww4       1/1     Running   0          8h
jaeger-54c44d879f-dhk7j       1/1     Running   0          32s
kiali-79b6d98d5d-znpnt        1/1     Running   0          32s
loki-0                        2/2     Running   0          32s
prometheus-6dd9fd5446-krfkz   2/2     Running   0          32s
接下來,我們利用port-forward的方式
把Kiali的服務對外開放
kubectl port-forward svc/kiali 20001:20001 -n istio-system
服務訪問
我們使用指令還快速訪問bookinfo
for i in $(seq 1 100); do curl -s -o /dev/null "http://localhost:8080/productpage"; done
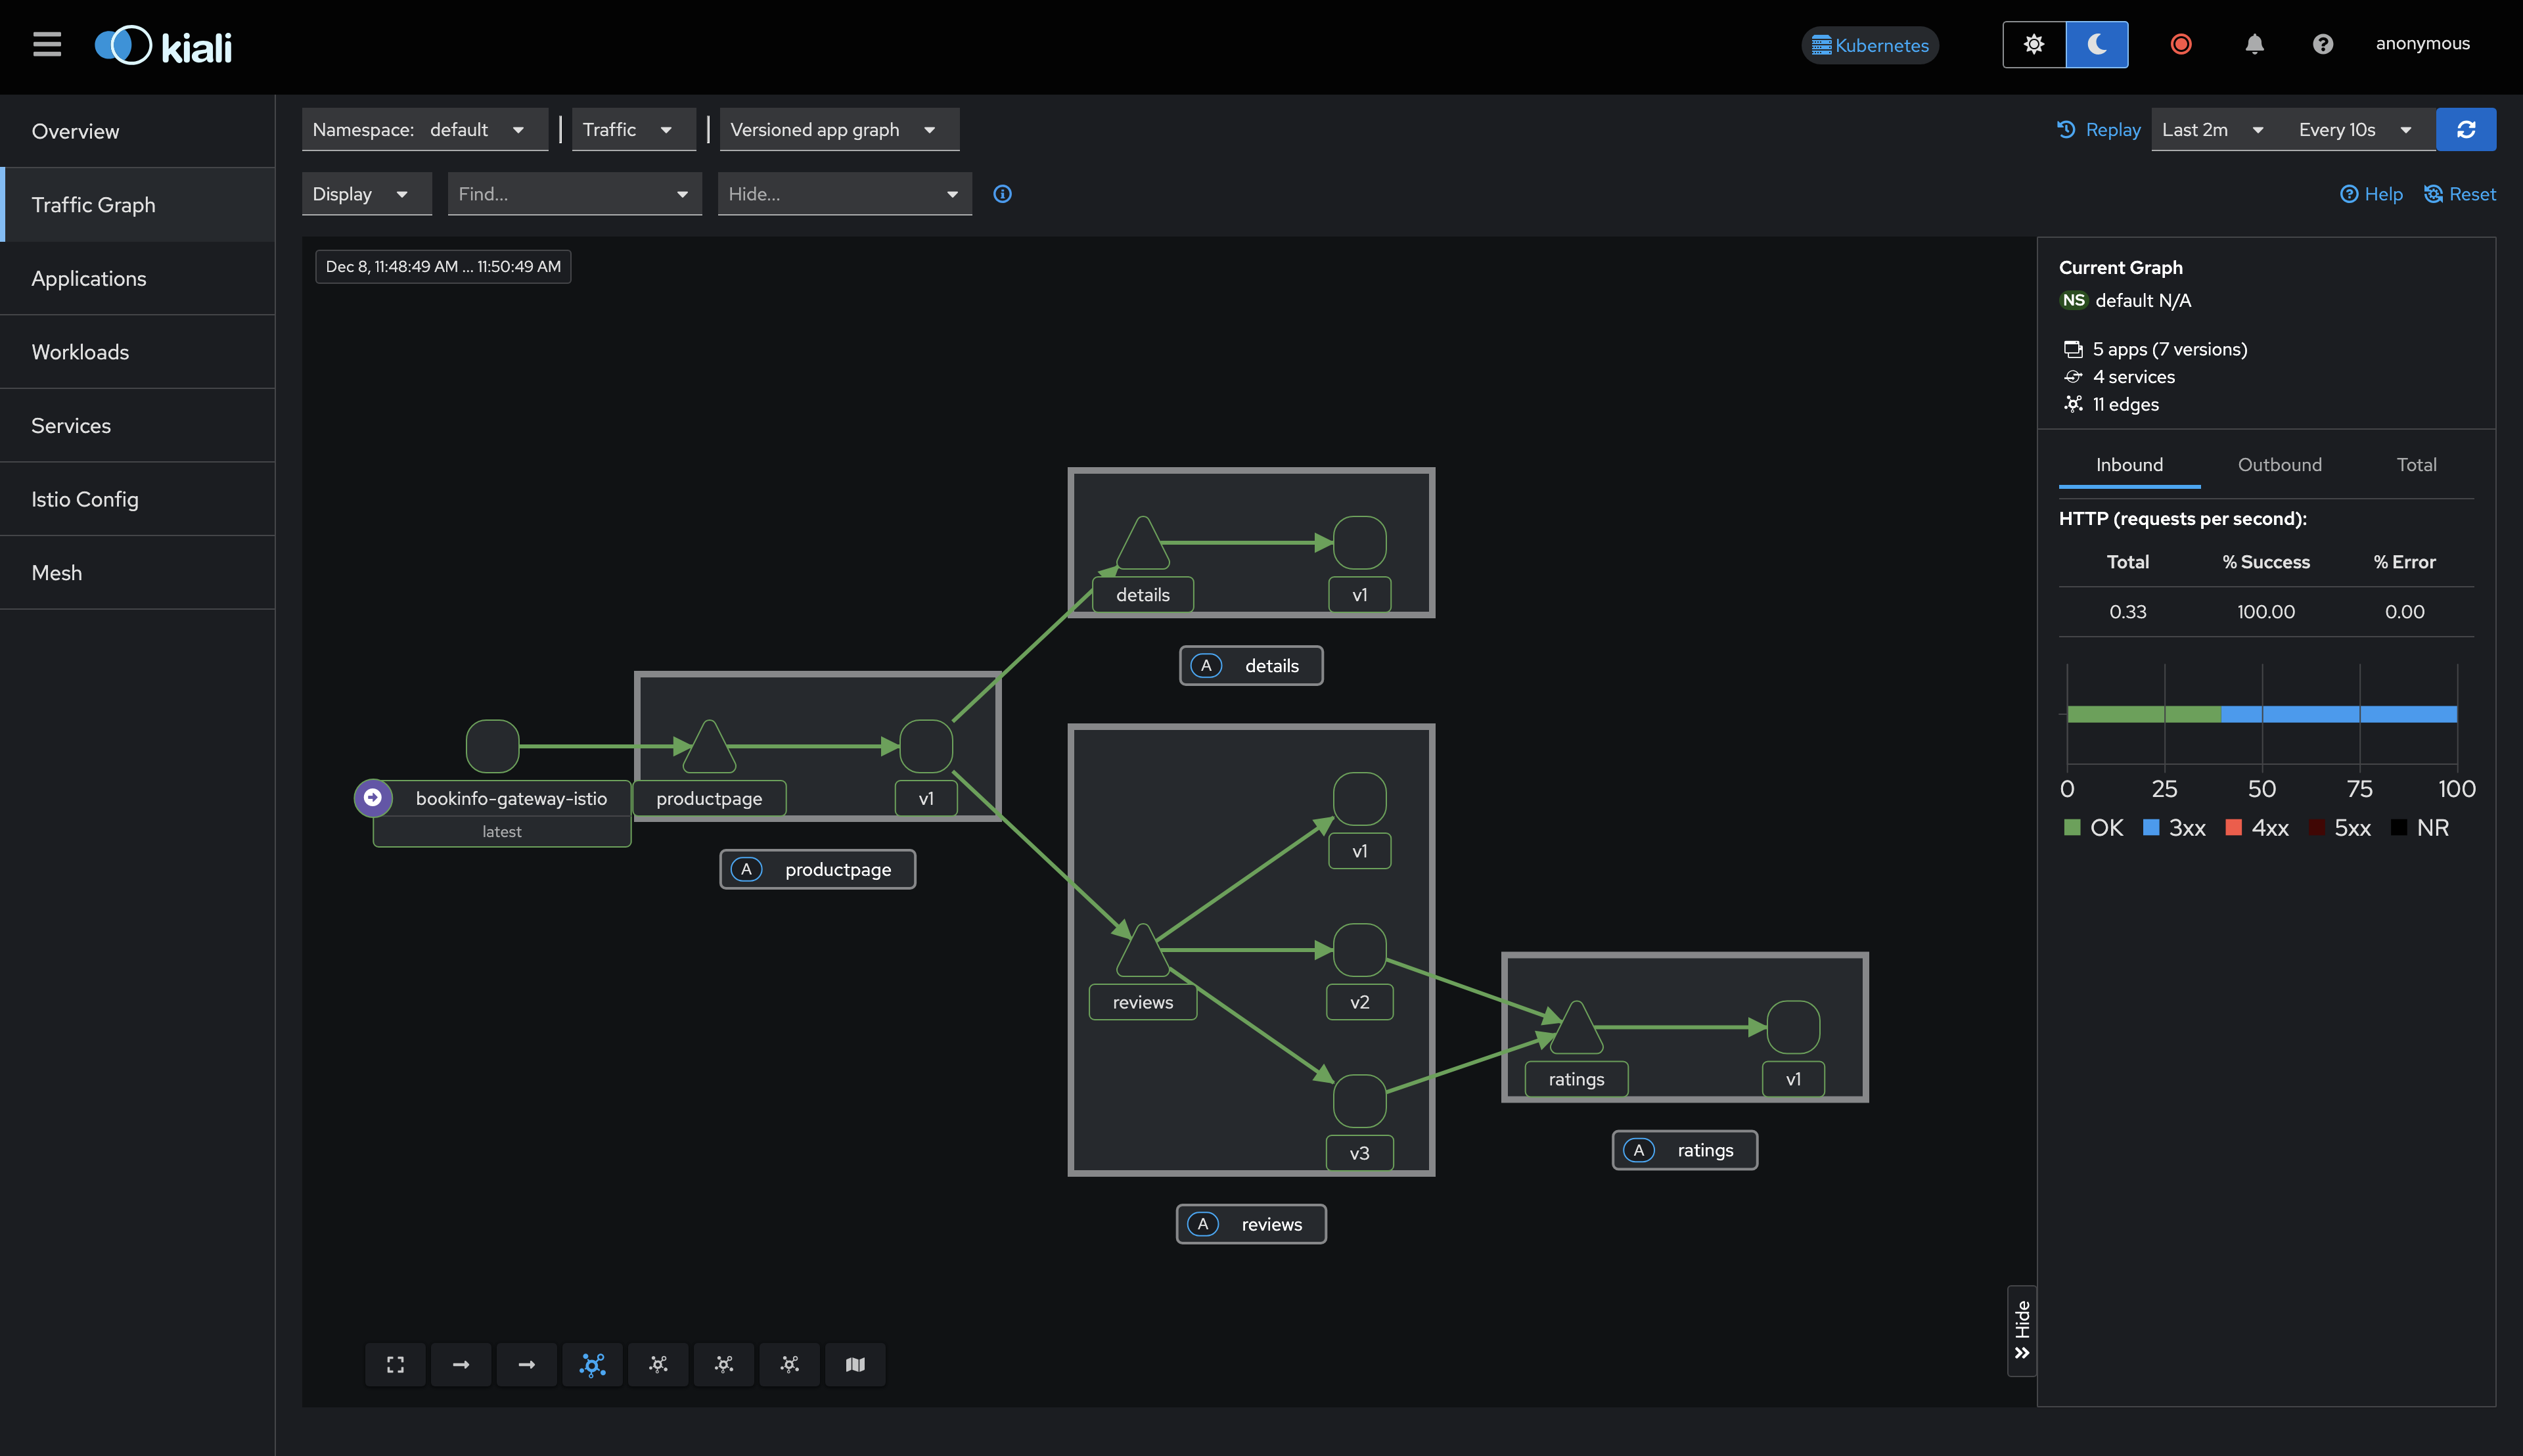
開啟瀏覽器訪問http://localhost:20001以查看 Kiali 網頁
將左側的導覽選單切換成 Traffic Graph,即可看到服務之間的關係,

